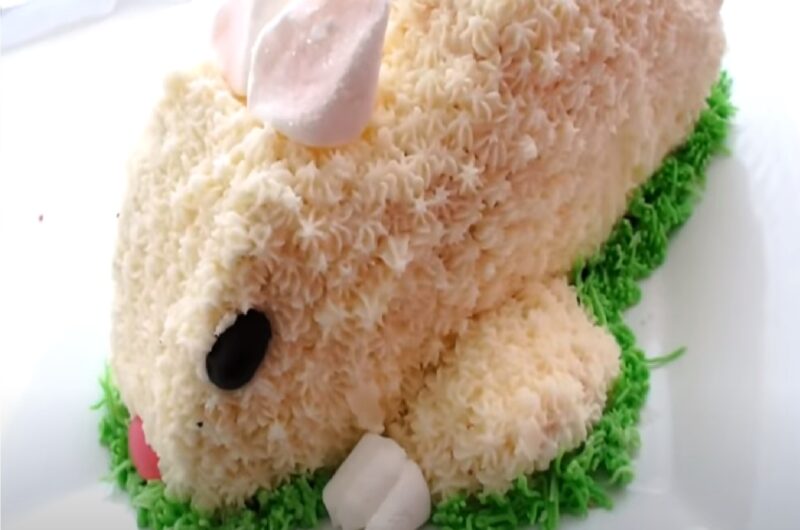
Shredded coconut, two coconut cakes, and decorating them to resemble a rabbit head are the trick to making this gorgeous Easter Bunny Cake. With swirls of purple, pink, and yellow, this simple Easter bunny cake is topped with coconut and jellybeans. The jellybeans offer a flash of color that is ideal for the eyes and nose, and the shredded coconut adds a texture that resembles fur. This cake can be made either plain or with Easter-themed colors within. It’s very easy, straightforward, and good.
Ingredients for the bunny cake:
for the frosting:
- 1 tablespoon of vanilla extract purified
- Confectioners’ sugar, 6 cups
- 1-2 teaspoons of milk
- pinch of salt, fine
for the cake:
- Two black jellybeans
- two marshmallows’
- 1 1/4 cups of sweetened flakes coconut, 1 white jellybean, cut in half lengthwise
- 2 biscotti from the store
- pink decorative frosting, one tube
- 1 wheel of black licorice, such as Haribo
- 2 cooked layers of a 9-inch circular cake (your favorite recipe or an 18.25-ounce boxed cake mix)
How to make the bunny cake
- Step 1: For the frosting, combine the sugar, butter, and salt in the paddle-assisted bowl of a stand mixer (or in a large bowl if using a hand-held electric mixer). until mostly incorporated, mix at low speed.
- Step 2: Mix till smooth after adding the vanilla and increasing the speed to medium-high.
- STEP 3: When the frosting is difficult to spread, add milk to change the consistency.
- Step 4: For the bunny, cover the flat side of one cake layer with a thin layer of frosting (approximately 2/3 cup), then top with the flat side of the second cake layer.
- Step 5: Cut through the layers of the cake at a distance of 5 inches, leaving 2 somewhat different-sized layered portions.
- Step 6: On a sizable platter or cake board, place the largest slice of cake cut side down. Place the larger piece so that the long edges are parallel to the long edges of the cake board if you’re using one. The bunny’s body looks like this.
- Step 7: To make two tiered wedges, cut the smaller piece of cake in half crosswise. One wedge should be placed in front of the body with its flat side against the body and its board-side flat side on the board. The side that curves will be on top.
- Step 8: Use a serrated knife to smooth off the head’s jagged edges. Remove the nose’s tip at a 45-degree angle. Keep all leftovers in a bowl.
- Step 9: Slice the remaining cake wedge into layers. The back legs will be these. With a knife, soften the cake wedges’ jagged edges before adding them to the scrap dish.
- Step 10: One piece should be placed on each side of the bunny, 1 inch from the end of its body, with one flat side down and the other flat side facing forward (the round side should be facing the back of the bunny).
- Step 11: Cake crumbs should be mixed with a fork in the bowl before being packed with your hands into a ball.
- Step 12: Put the ball behind the bunny’s body, then use some icing to secure it. The bunny’s tail is shown here.
- Step 13: Using two to three cups of frosting, cover the entire bunny tail and all while maintaining some definition in the bunny’s parts and icing more liberally around any sharp edges to give the bunny’s components a rounded appearance.
- Step 14: To completely cover the bunny, sprinkling coconut over it. Pat gently to secure.
- Step 15: Between the head and torso, place a biscotti and secure it by pressing it into the cake. the ears are like this. The ears should be angled out and placed with their bases closely spaced in the middle of the head.
- Step 16: Add some icing to the front of each biscotti. Then, using the pink decorating icing, pipe a thin strip of frosting down to the point where the ears and head of each biscotti.
- Step 17: Put a black jellybean for each of the eyes into the sides of the head to create the face.
- Step 18: To create the rabbit cheeks, cut one of the marshmallows into three circles, remove the center piece, and push the two end circles, cut sides in, into the front of the face.
- Step 19: For the teeth, press the white jellybean halves with their rounded sides facing into the face beneath the cheeks. The pink jellybean should be placed above the nose.
- Step 20: Cut two pieces, each measuring about 1 1/2 inches long, from the unrolled licorice wheel.
- Step 21: Peel the strips halfway down for each piece, then cut each split strip in half lengthwise to create a piece that resembles a broom.
- Step 22: Do the same with the second licorice stick.
- Step 23: Each piece should be tucked under a marshmallow cheek with a dab of icing, with the cut ends facing out for the whiskers. Second marshmallow should be split lengthwise.
- Step 24: To create the bunny’s feet, cut 3 slits in each half, about halfway through (these are the toes). Place the feet in front of the legs. If required, use icing to adhere the bottoms of the feet.
Different looks you can go for of Bunnies Cake:
Fluffy Bunny Cake:
This cake is the ideal blend of quick and easy, making it the ideal sweet treat for baby showers and other spring events.
Easter Bunny Face Cake:
Made using the Bunny Cake Pan and embellished with nonpareils and icing pouches, this delicacy is ideal for amateur decorators.
Dotty the Easter Bunny Cake:
Cake layers of pink, yellow, and blue create a joyful surprise when Dotty the Easter Bunny Cake is split open. The adorable bunny outline on the edge of your cake is a simple and quick way to add an eye-catching visual feature.
Do you know these about bunny cake
History of bunny cake:
Around 1970, Baker’s Coconut created the traditional bunny cake and featured it in a promotional booklet (the second in a series) of “cut-up” animal cakes.
What does Easter cake symbolize?
Easter cakes are typically created and served during the Easter season. They might be cakes or sweet breads. They have a long history of fellowship with the Catholic, Greek Orthodox, Russian Orthodox, and other Northern European Christian churches.
Bunny Cake
Difficulty: Easy4
servings30
minutes30
minutes520
kcalIngredients
- for the frosting:
3 sticks (12 ounces) of unsalted butter, at room temperature
1 tablespoon of vanilla extract purified
Confectioners’ sugar, 6 cups
1-2 teaspoons of milk
pinch of salt
- for the cake:
Two black jellybeans
two marshmallows’
1 1/4 cups of sweetened flakes coconut, 1 white jellybean, cut in half lengthwise
2 biscotti from the store
pink decorative frosting, one tube
1 wheel of black licorice, such as Haribo
2 cooked layers of a 9-inch circular cake (your favorite recipe or an 18.25-ounce boxed cake mix)
Directions
- For the frosting, combine the sugar, butter, and salt in the paddle-assisted bowl of a stand mixer (or in a large bowl if using a hand-held electric mixer). until mostly incorporated, mix at low speed. Mix till smooth after adding the vanilla and increasing the speed to medium-high.
- For the bunny, cover the flat side of one cake layer with a thin layer of frosting (approximately 2/3 cup), then top with the flat side of the second cake layer.
- Cut through the layers of the cake at a distance of 5 inches, leaving 2 somewhat different-sized layered portions.
- On a sizable platter or cake board, place the largest slice of cake cut side down. Place the larger piece so that the long edges are parallel to the long edges of the cake board if you’re using one. The bunny’s body looks like this.
- To make two tiered wedges, cut the smaller piece of cake in half crosswise. One wedge should be placed in front of the body with its flat side against the body and its board-side flat side on the board. The side that curves will be on top.
- Use a serrated knife to smooth off the head’s jagged edges. Remove the nose’s tip at a 45-degree angle. Keep all leftovers in a bowl.
- Slice the remaining cake wedge into layers. The back legs will be these. With a knife, soften the cake wedges’ jagged edges before adding them to the scrap dish.
- One piece should be placed on each side of the bunny, 1 inch from the end of its body, with one flat side down and the other flat side facing forward (the round side should be facing the back of the bunny).
- Cake crumbs should be mixed with a fork in the bowl before being packed with your hands into a ball. Put the ball behind the bunny’s body, then use some icing to secure it. The bunny’s tail is shown here.
- Using two to three cups of frosting, cover the entire bunny tail and all while maintaining some definition in the bunny’s parts and icing more liberally around any sharp edges to give the bunny’s components a rounded appearance.
- To completely cover the bunny, sprinkling coconut over it. Pat gently to secure.
- Between the head and torso, place a biscotti and secure it by pressing it into the cake. the ears are like this. The ears should be angled out and placed with their bases closely spaced in the middle of the head.
- Add some icing to the front of each biscotti. Then, using the pink decorating icing, pipe a thin strip of frosting down to the point where the ears and head of each biscotti. Put a black jellybean for each of the eyes into the sides of the head to create the face.
- To create the rabbit cheeks, cut one of the marshmallows into three circles, remove the center piece, and push the two end circles, cut sides in, into the front of the face.
- For the teeth, press the white jellybean halves with their rounded sides facing into the face beneath the cheeks. The pink jellybean should be placed above the nose.
- Cut two pieces, each measuring about 1 1/2 inches long, from the unrolled licorice wheel. Peel the strips halfway down for each piece, then cut each split strip in half lengthwise to create a piece that resembles a broom. Do the same with the second licorice stick.
- Each piece should be tucked under a marshmallow cheek with a dab of icing, with the cut ends facing out for the whiskers. Second marshmallow should be split lengthwise.
- To create the bunny’s feet, cut 3 slits in each half, about halfway through (these are the toes). Place the feet in front of the legs. If required, use icing to adhere the bottoms of the feet.
Notes
- When the frosting is difficult to spread, add milk to change the consistency.
